Configuration Basics
Creating Project
Configuration of Rapid SCADA is performed on a project basys. A project is a set of files in various formats that are stored in the project directory. To create and edit projects, use the Administrator application. When Administrator starts, the Start page opens, which contains the buttons to create a new or open an existing project (see Figure 1).

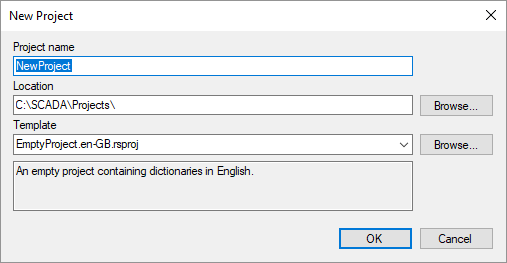
Pay attention to the Template field of the project creation form (see Figure 2). The template defines the initial configuration that is added to the project. Another existing project can be used as a template.
Project Structure
Rapid SCADA configuration is displayed in the project explorer, which is located in the left part of the main Administrator window. The project consists of the following main parts (Fig. 3):
- The configuration database is a structured description of the entire automated system. The configuration database defines the system in general, while the detailed settings refer to the corresponding Rapid SCADA applications.
- Interface. This configuration section contains files of views and report configuration files. Examples of views: schemes, tables, maps and dashboards.
- Server application settings.
- Communicator application settings.
- Webstation web application settings. It is more convenient to to edit the Webstation settings through the web interface, and then download them into the project.
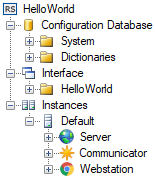
An instance is a computer on which Rapid SCADA is deployed. A single project can include multiple instances of Rapid SCADA that exchange data. The Administrator application can connect to remote servers for downloading and uploading configuration, therefore, Rapid SCADA can be configured using one workstation.
General Configuration Sequence
Starting to work with Rapid SCADA, it is recommended to follow the general configuration sequence described below. Having obtained some experience, better understanding the dependencies between the applications, the sequence can be varied to increase efficiency.
- Create a new or open an existing project.
- Add objects, communications lines and devices into the configuration database. To create communication lines and devices it is recommended to use wizards that are opened using the
 and
and  buttons located on the Administrator's toolbar.
 - Check that the added communication lines and devices are present in the Communicator settings. If necessary, import them by selecting the Import menu item from the context menu of the Communication Lines node of the project explorer.
- Configure communication with devices in Communicator.
- Create input and output channels in the configuration database. It is recommended to use the wizard opened by the
 button.
 - Create views and specify them in the Interface table of the configuration database.
- Upload the project to the server by the
 button.