Web Plugin Development
Using web plugins you can create:
- New types of views.
- Components for mimic diagrams.
- Reports.
- Web pages for data manipulation.
Let's look at the development of the web interface and interface for configuration a simple plugin, which will be named PlgAbc. To develop a complex plugin, learn and use the source code of existing plugins on GitHub as examples.
Implementation of Web Interface
Create a new project based on the Razor Class Library template. Enter the project name PlgAbc, select the .NET 8.0 framework and set the Support pages and views checkbox.
Add dependencies to the ScadaCommon.dll, ScadaCommon.Log.dll and ScadaWebCommon.dll libraries. Binary files of the libraries can be found in the Rapid SCADA installation directory, or compiled from source code.
Double click a project node in Solution Explorer to open the project file PlgAbc.csproj and edit its properties as shown below.
<PropertyGroup>
  <TargetFramework>net8.0</TargetFramework>
  <Nullable>disable</Nullable>
  <ImplicitUsings>enable</ImplicitUsings>
  <AddRazorSupportForMvc>true</AddRazorSupportForMvc>
  <RootNamespace>Scada.Web.Plugins.PlgAbc</RootNamespace>
</PropertyGroup>
Create a PluginInfo class and copy the code below. This class contains information that describes the plugin.
namespace Scada.Web.Plugins.PlgAbc
{
    internal class PluginInfo : LibraryInfo
    {
        public override string Code => "PlgAbc";
        public override string Name => "ABC Plugin";
        public override string Descr => "Simple plugin example";
    }
}
Create a PlgAbcLogic class whose code is shown below. This class implements the basic logic of the plugin. Note that the namespace and class name must contain the PlgAbc plugin code. Explore the source code of the PluginLogic base class to learn about the capabilities available when implementing plugin logic.
using Scada.Data.Entities;
using Scada.Web.Services;
using Scada.Web.TreeView;
using Scada.Web.Users;
namespace Scada.Web.Plugins.PlgAbc
{
public class PlgAbcLogic : PluginLogic
{
public PlgAbcLogic(IWebContext webContext)
: base(webContext)
{
Info = new PluginInfo();
}
public override List<MenuItem> GetUserMenuItems(User user, UserRights userRights)
{
return
[
new() { Text = "ABC", Url = "~/Abc/MyPage", SortOrder = MenuItemSortOrder.First }
];
}
}
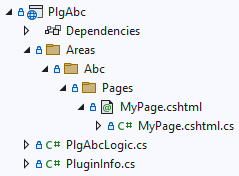
}Create an empty Razor Page named MyPage.cshtml located in the Abc area. The project structure is shown in the following figure.
The contents of the MyPage.cshtml.cs page model are shown below. To better understand the page source code, it is suggested to view the service interfaces available in the web application through dependency injection.
using Microsoft.AspNetCore.Mvc.RazorPages;
using Scada.Web.Services;

namespace Scada.Web.Plugins.PlgAbc.Areas.Abc.Pages
{
    public class MyPageModel(IWebContext webContext, IUserContext userContext) : PageModel
    {
        public int ChannelCount => webContext.ConfigDatabase.CnlTable.ItemCount;
        public string UserName => userContext.UserEntity.Name;
    }
}
The page layout file MyPage.cshtml has the following contents:
@page
@model Scada.Web.Plugins.PlgAbc.Areas.Abc.Pages.MyPageModel
@{
    Layout = "_MainLayout";
    ViewBag.Title = "My Page";
}

<h1>My Page</h1>
<p>Number of channels: @Model.ChannelCount</p>
<p>Current user: @Model.UserName</p>
An example of the web interface of the plugin is ready. Build the project and copy PlgAbc.dll to the root directory of the Webstation application.
Implementation of Configuration Interface
Create a new project based on the Class Library template. Enter the project name PlgAbc.View, and select the .NET 8.0 framework.
Add dependencies to the ScadaCommon.dll and ScadaWebCommon.Subset.dll libraries.
Double click a project node in Solution Explorer to open the project file PlgAbc.View.csproj and edit its properties as shown below.
<PropertyGroup>
<TargetFramework>net8.0</TargetFramework>
<ImplicitUsings>enable</ImplicitUsings>
<Nullable>disable</Nullable>
<RootNamespace>Scada.Web.Plugins.PlgAbc.View</RootNamespace>
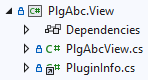
</PropertyGroup>Add the previously created PluginInfo.cs file to the project as a reference. Note that the file icon looks like a link.
Create a PlgAbcView class and copy the code below. This class implements the user interface of the plugin for the Administrator application. Note that the namespace and class name must contain the PlgAbc plugin code. In the example, there is actually no user interface for the plugin, however, a minimal implementation of the interface is required so that the plugin can be used in the Administrator application. View the source code of the PluginView base class to learn about the available features.
namespace Scada.Web.Plugins.PlgAbc.View
{
    public class PlgAbcView : PluginView
    {
        public PlgAbcView()
        {
            Info = new PluginInfo();
        }
    }
}
Build the project and copy PlgAbc.View.dll to the Administrator libraries directory ScadaAdmin\Lib
Run Plugin
Start the Administrator application or restart it if it is open. Create and open a copy of the HelloWorld project, then find the developed plugin in the Webstation > Plugins section. Select the plugin and make sure its description is displayed correctly. If an error occurs when displaying a plugin description, there is most likely an inaccuracy in the namespace or class names of the plugin user interface.
Activate the PlgAbc plugin and upload the project for execution. In the Webstation application, navigate to Main Menu > ABC to open the web page provided by the developed plugin.